Follow Me On Social Media!

Marbled Easter Eggs: Joyfully Colorful and Deliciously Fun!
Introduction to Marbled Easter Eggs
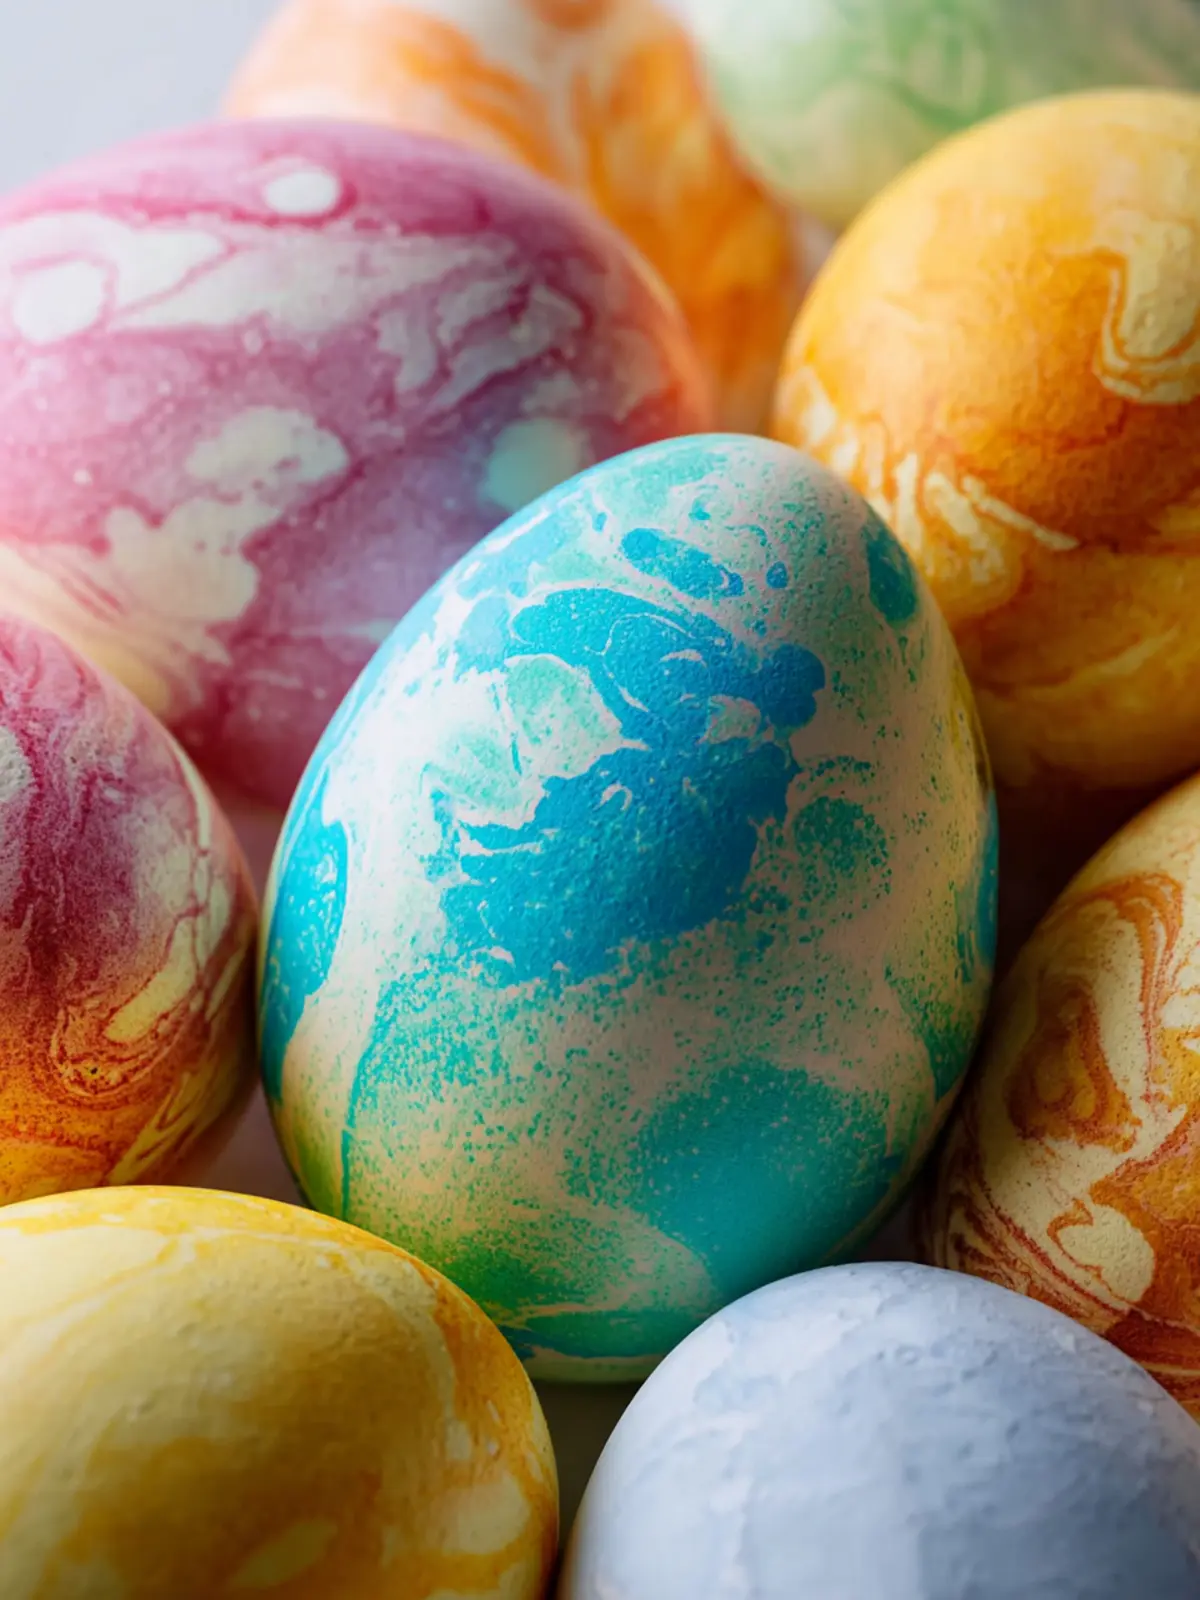
Creating marbled Easter eggs has become a cherished tradition that infuses a burst of color and creativity into the spring season. Imagine gathering around with friends or family, surrounded by vibrant, swirling colors, and the delightful mess of paint and dye. Not only does this festive activity brighten up your home, but it also sparks joy and fosters bonding moments as everyone, from toddlers to grandparents, contributes to the artistry of egg decorating.
What makes marbled Easter eggs a fun tradition? It starts with the unique aesthetics of marbling. Unlike standard dyed eggs, marbled eggs invite playful creativity, as each egg transforms into a little work of art with its own distinct patterns and hues. The process allows for experimentation with various shades, creating surprising color combinations that reflect the vibrancy of spring.
Beyond the visual appeal, this egg-decorating journey often brings with it a sense of nostalgia. Many people have fond memories tied to this tradition—perhaps a beloved family member teaching them the technique or an impromptu egg fight after the decorating was done. For many, it’s a rite of passage that marks the arrival of spring and Easter celebrations.
Moreover, marbled eggs also have their roots in various cultural traditions, making them a perfect blend of history and modern celebration. From the Eastern European practice of Pysanky, utilizing intricate designs colored with natural dyes, to the simpler, playful methods embraced in households today, the tradition evolves while honoring its rich legacy.
In crafting these marbled Easter eggs, not only do we engage in a tactile and artistic experience, but we also create cherished memories that inspire laughter and creativity long after the last egg has been dyed. This holiday season, set aside some time to embrace the beauty of imperfection and the joy of teamwork as you create your own vibrant eggs. It’s not just about the final product; it’s about the moments that make this tradition unforgettable.

Key Ingredients for Marbled Easter Eggs
Creating marbled Easter eggs is as much about the experience as it is about the outcome, and the right ingredients will take your egg decorating to the next level. Just imagining the vibrant colors swirling together on a smooth eggshell can spark nostalgia for childhood Easters, don’t you think?
-
White Eggs: Opt for white eggs for marbling since they provide a clean canvas for the dye to pop. Natural egg whites also yield a more vibrant hue compared to brown eggs, ensuring your marbled design stands out.
-
Vinegar: This unsung hero not only helps the dye adhere to the eggs but also intensifies the colors. Just a splash mixed into your dye bath works wonders!
-
Food Coloring: The star of your marbled Easter eggs! Use liquid food coloring for flexibility. You can create various shades by mixing colors, allowing your creativity to shine.
-
Oil: A little oil can add that gorgeous marbled effect. When mixed with dye, it forms interesting patterns as it resists the dye, making each egg unique.
-
Water: You’ll need water for your dye mixtures. Distilled water is ideal, as it eliminates minerals that might spoil your colors.
Using these ingredients, prepare for a fun and rewarding crafting session. As you dive into this project, imagine how they’ll look in your Easter basket or displayed around your home!
Why You’ll Love This Recipe
Creating marbled Easter eggs is not just about the final product; it’s about indulging in a delightful family activity that brings joy and creativity to your festivities. Picture this: the laughter of kids giggling as they dip the eggs in vibrant colors, each swirl revealing unique patterns.
One of the highlights of this recipe is how it combines a simple technique with stunning visual results. You don’t need to be an artist to make these eggs look beautiful. Just a few easy steps let you embrace your inner craft enthusiast!
-
Fun for Everyone: Whether you’re hosting a family gathering or having a quiet brunch, marbled Easter eggs double as a fun project for all ages. Everyone can participate, making it a perfect way to bond with family and friends.
-
A Feast for the Eyes: Not only do these eggs look picturesque in your Easter basket, but they also make a stunning centerpiece for your dinner table. The vibrant colors symbolize spring and renewal, which is just what we need this time of year.
-
Memory-Making: These eggs can become a cherished annual tradition, where each year you can reflect on previous designs and colors, ensuring every Easter is memorable.
Transform your holiday experience by incorporating this creative activity into your plans, and you’ll soon discover why marbled Easter eggs will be a staple in your celebration!

Variations for Marbled Easter Eggs
Creating marbled Easter eggs can be a delightful activity, and there’s plenty of room to get creative! Here are some fun variations to try.
Vibrant Colors
Experiment with natural dyes for a unique look. Using ingredients like beet juice for pink or turmeric for yellow adds an organic twist—perfect for those who prefer a more earthy vibe. Mixing food coloring with water provides a broader palette for vibrant eggs as well.
Texture Play
Want to give your marbled Easter eggs a little extra flair? Consider wrapping them in lace or netting before dyeing. Once dry, unwrap them to reveal intricate patterns. This method not only enhances the marbling effect but also adds a layer of texture that’s visually striking.
Metallic Finishes
For a touch of glam, try using metallic spray or paint after dyeing your eggs. A light coat adds a shiny finish that captures the light beautifully. Just remember to handle these eggs with care as they’ll be a little less durable than naturally dyed versions.
Edible Designs
If you’re feeling adventurous, use edible markers to draw designs after dyeing. This can turn your marbled Easter eggs into canvases for intricate artwork. It’s a fantastic way to personalize each egg, creating one-of-a-kind masterpieces without the mess!
With these variations, your Easter egg decorating can truly be a creative highlight of the season!
Cooking Tips and Notes for Marbled Easter Eggs
Creating marbled Easter eggs is not just a fun activity; it’s a chance to unleash your creativity and make beautiful, edible art! Here are some helpful tips and notes to ensure your marbling process goes smoothly.
Choose the Right Eggs
Using fresh, white eggs will yield the best results. Brown eggs may not show the marbled designs as vibrantly. If you’re working with hard-boiled eggs, ensure they’re cooked thoroughly for easier handling and better absorption of color.
Perfect Your Dye Technique
To achieve the stunning marbled effect, a simple trick involves oil. Adding a few drops of vegetable oil to your dye will create a swirling effect as the oil repels the color. Don’t be afraid to mix and match colors to see what combinations you love best!
Timing is Key
Let your dyed eggs rest for a few minutes before rinsing off excess color. This allows the marbled pattern to set in beautifully. You want to be patient; sometimes, the magic takes a moment!
Use Natural Dyes for Unique Patterns
If you’re looking for a more organic approach, consider using natural dyes from ingredients like beet juice for pink or turmeric for yellow. Not only do they offer a unique aesthetic, but they often provide a softer, earth-friendly alternative to typical dyes.
These simple yet impactful tips can elevate your marbled Easter eggs to a new level. Enjoy the process, and don’t forget to invite family and friends to join the fun!
Serving Suggestions for Marbled Easter Eggs
Transform your marbled Easter eggs into delightful centerpieces or snacks that will captivate your guests. These vibrant eggs not only showcase your artistry but also invite creativity to the table.
Beautiful Display Ideas
-
Egg Carton Presentation: Arrange your marbled Easter eggs back in their original carton for a charming display. You could even add a decorative touch with ribbons or labels indicating flavors if you used different ingredients in your dyeing process.
-
Floral Accents: Pair your eggs with spring flowers. A mini vase with fresh blooms can bring life to your egg display, making it perfect for brunch or a family gathering.
Tasty Pairings
While your marbled Easter eggs are a feast for the eyes, they can also be enjoyed as a snack. Serve them alongside:
- Cheese and Crackers: A platter of assorted cheeses and whole-grain crackers complements the eggs beautifully and provides a savory contrast.
- Veggie Platter: Pair your eggs with a colorful array of vegetables and a tasty dip, making for a nutritious and visually appealing spread.
Fun Activities
Engage your guests in a lighthearted egg hunt or a decorative contest, where they can showcase their own marbled designs. This not only adds to the festive spirit but also creates lasting memories.
By presenting your marbled Easter eggs thoughtfully, you’ll create an inviting atmosphere that everyone will enjoy!
Time Breakdown for Marbled Easter Eggs
Creating beautiful marbled Easter eggs can be a delightful way to celebrate the season and make memories with friends and family. As you embark on this colorful journey, here’s a quick breakdown of the time you’ll need to bring your festive vision to life.
Preparation time
First, you’ll want to budget about 15 minutes for preparation. This includes gathering your ingredients, hard boiling the eggs, and setting up your dye stations.
Dyeing time
The dyeing process will take approximately 30 minutes. This time allows for each layer of color to set before moving on to the next, ensuring those lovely marbled effects develop beautifully.
Total time
In total, you’re looking at around 45 minutes to get those stunning marbled Easter eggs from an idea to a reality. Grab your supplies, let the creative juices flow, and enjoy the process!
Nutritional Facts for Marbled Easter Eggs
When celebrating the season with marbled Easter eggs, it’s not just about the beautiful decorations; it’s also a good idea to consider their nutritional qualities. Whether you’re dyeing them for an egg hunt or decorating your table, understanding what goes into these eggs can enhance your experience.
Calories
A medium-sized boiled egg contains approximately 68 calories. The beauty of marbled Easter eggs lies in their potential for creativity without a hefty caloric cost.
Protein
These eggs are a powerhouse of protein, delivering about 6 grams per egg. Including them in your diet helps support muscle function and can keep you full longer.
Other Nutrients
In addition to protein, marbled Easter eggs offer a plethora of essential nutrients. They are rich in:
- Vitamin B12: Vital for nerve health and energy production.
- Selenium: An antioxidant that helps protect your cells.
- Vitamin D: Important for bone health and immune support.
- Choline: Supports brain function and development.
So, while you’re enjoying your marbled Easter eggs, know that you’re feeding your body with nourishing goodness!
FAQs about Marbled Easter Eggs
Creating those marbled Easter eggs sparks joy and a bit of creativity. But it’s normal to have questions on how to enhance your dyeing experience. Here are some answers to the most common queries.
Can I use natural dyes instead of food coloring?
Absolutely! Natural dyes can give your marbled Easter eggs beautiful, earthy tones. You can use ingredients like beet juice for red, turmeric for yellow, and red cabbage for blue. Just simmer these items in water to release their colors, then strain the liquid. The resulting dye can create unique patterns that are both vibrant and gentle on the environment.
How long can I store the dyed eggs?
Once your marbled Easter eggs are dyed and dried, you can store them in the refrigerator for up to one week. To keep them fresh, it’s best to place them in a carton or a bowl and avoid direct sunlight. If you’ve used natural dyes, be aware that the colors may fade over time, but they’ll still be safe to eat if kept properly.
What are creative ways to use marbled eggs?
Aside from hunting for them during Easter festivities, marbled Easter eggs can be a fantastic addition to your spring décor. Use them as centerpieces, create garlands by threading them together, or incorporate them into a seasonal wreath. You could even craft unique gift tags by hot-gluing mini marbled eggs to cards. The possibilities are practically endless, making them a fun, versatile project!
Conclusion on Marbled Easter Eggs
Creating stunning marbled Easter eggs isn’t just a fun activity; it’s an opportunity to express your creativity and add a personal touch to your festive celebrations. As you observe the beautiful swirls and patterns emerge, you may find that the experience is as rewarding as the final product. These marbled eggs can enhance your decor or serve as delightful gifts that showcase your artistic flair. So, gather your materials, follow the techniques, and take pride in your uniquely crafted marbled Easter eggs. This Easter, let your creativity blossom and enjoy the joy that comes with making something truly special for your loved ones.
Print
Dyeing Hard-Boiled Eggs
- Total Time: 20 minutes
- Yield: 12 eggs 1x
Description
Learn how to create vibrant colors on hard-boiled eggs for your next celebration.
Ingredients
Scale
- 12 cup hard-boiled eggs
- ½ tablespoon boiling water
- 1 tablespoon cooking oil
- ½ white distilled vinegar
- 10–20 drops food dye
Instructions
- Prepare the Dye: Use one bowl per color, adding ½ cup boiling water, ½ tbsp vinegar, and 10-20 drops of dye (fewer for dark colors, more for light). Stir well.
- Add Oil: Mix 1 tablespoon of cooking oil into each bowl, leaving a small amount aside.
- Oil the Eggs: Lightly streak oil onto each egg with a finger or brush, avoiding full coverage.
- Dye the Eggs: Stir the dye and oil mixture, then quickly roll the egg in it. Remove immediately and wipe dry.
- Dry: Let eggs sit in a carton for 5 minutes before handling further.
Notes
- Use gloves when handling food dye to avoid staining your hands.
- Test dye concentrations on a spare egg to achieve desired colors.
- Prep Time: 10 minutes
- Cook Time: 10 minutes
- Category: Dessert
- Method: Dyeing
- Cuisine: American
Nutrition
- Serving Size: 1 egg